Install and Configure Python3
Know for it strength ins data analytics, automation, scripting and machine learning development. In this article we’ll describe the step-by-steps installation and configuring Python in your programming environment. Python 3 is the current version as of this writing thus it will be the version of choice.
In this article server is running on Centos
# Update the system
yum -y update
# Python development tools
yum -y install yum-utils
yum -y groupinstall development
# Let's install Python3
yum install -y python3
# Version check
python3 -V
Python3 base development tools is now completed. What we want to next is to install ‘pip‘. PIP is software package manager for python.
# Installing pip
yum install python3-pip
Configuring the Python programming environment
After successful installation of Python we can also create our programming environment (or virtual environment). Virtual programming environment enables you to isolate your projects, avoiding clash or conflicts.
# create environment directory
mkdir /<projects>/<project1>/
# using 'venv' to initialize/setup <project1> environment
python3 -m venv /<projects>/<project1>
# Activate the environment in order to use it
source /<projects>/<project1>/bin/activate
# indication the environment is activated
(project1) [subok@localhost project1]#
Let’s write our first python code
# simple script to join two variable (subok1.py)
var1 = "Subok "
var2 = "Technologies"
var1_var2 = var1 + var2
print(var1_var2)
# run the script
python3 subok1.py
#result
Subok Technologies
Congratulations! You have a Python 3 virtual programming environment on Centos! Start working on your project.
Another interesting setup is to use the interactive Jupyter Notebook. A web-based environment for your python projects.
Using the Jupyter Notebook
Jupyter Notebook is a very good way to write and execute small portions (snippets) of codes. It comes with different kernels of programming languages and by default it is set to IPython. In this section, will guide you how to setup and run snippets.
# Make sure that you programming environment is activated.
# Refer to the previous section of this article
#
# using 'pip' we'll install the jupyter notebook
python3 -m pip install jupyter
After successful installation we will see how we can run the application
# run the following in your programming environment
jupyter notebook
Successfully loaded jupiter notebook is indicated as follow
[I 14:04:36.779 NotebookApp] Writing notebook server cookie secret to /home/subok/.local/share/jupyter/runtime/notebook_cookie_secret
[I 14:04:37.022 NotebookApp] Serving notebooks from local directory: /home/subok
[I 14:04:37.023 NotebookApp] Jupyter Notebook 6.1.4 is running at:
[I 14:04:37.023 NotebookApp] http://localhost:8888/?token=9fa4045f6d6d4ad121011c67c4467572a6d3ff94af0d324e
[I 14:04:37.023 NotebookApp]  or http://127.0.0.1:8888/?token=9fa4045f6d6d4ad121011c67c4467572a6d3ff94af0d324e
[I 14:04:37.023 NotebookApp] Use Control-C to stop this server and shut down all kernels (twice to skip confirmation).
[W 14:04:37.027 NotebookApp] No web browser found: could not locate runnable browser.
[C 14:04:37.028 NotebookApp]
    To access the notebook, open this file in a browser:
        file:///home/subok/.local/share/jupyter/runtime/nbserver-6721-open.html
    Or copy and paste one of these URLs:
        http://localhost:8888/?token=9fa4045f6d6d4ad121011c67c4467572a6d3ff94af0d324e
     or http://127.0.0.1:8888/?token=9fa4045f6d6d4ad121011c67c4467572a6d3ff94af0d324e
How to connect to Jupyter Notebook using SSH tunneling
SSH tunneling is a method of transporting arbitrary networking data over an encrypted SSH connection. It can be used to add encryption to applications. It also provides a way to secure the data traffic of any given application using port forwarding.
We will be using’putty’ to demonstrate the ‘howto’ ssh tunnel connection
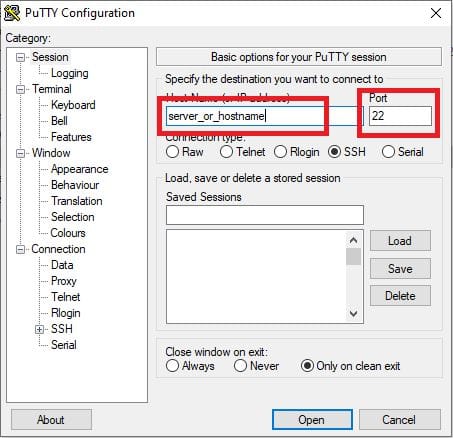
Open the putty application and create a SSH session (firgure1), click on ‘SSH’ category to configure the port forwarding parameters (figure2)

Next step is to setup assign a local port on your windows machine ( i.e. putty source port parameter). We select port 8099 in this example. In the putty destination parameter, enter the ‘localhost’ together with the port used by Jupyter Notebook (i.e. localhost:8888). Click ‘open’ and login as usual to your server
After successful login, activate the programming environment you setup and start jupyter notebook application
# activate programming environment
source /<projects>/<project1>/bin/activate
# start jupyter
jupyter notebook
Following indicates successful activation

From your windows machine, open browser and enter the url –> http://localhost:8099 You should now be able to open the Jupyter Notebook web-application (figure 4). From here you can login with ‘token’ (figure3) and/or setup a password

Congratulations!! Start coding

Python continuous popularity is becoming a trend. It provides strong cross-platform functionalities and flexibility in addressing development goals. Also, it has a large community support, lots of available tools and libraries that reduces time and effort to write codes and functions. Python with its constant growth, plays a vital role on development advances of latest technologies such as machine learning and AI development.